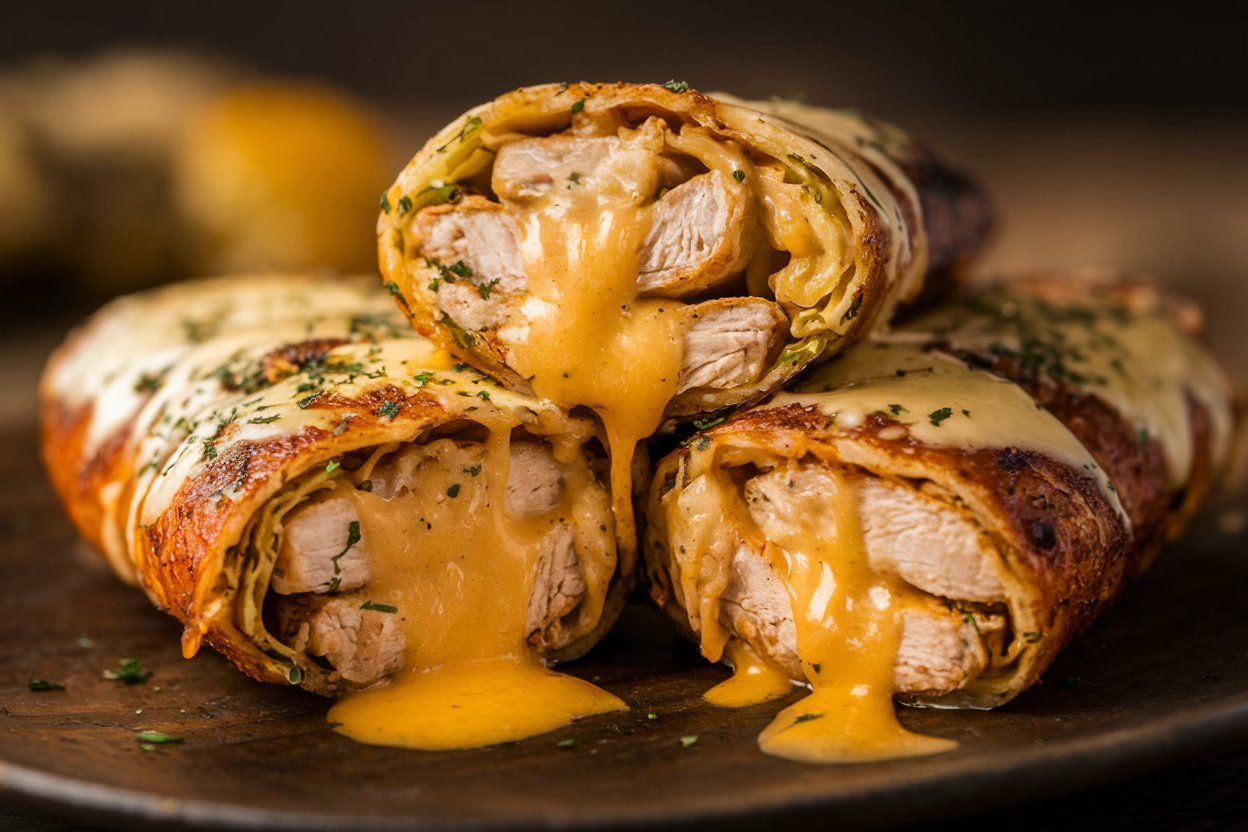
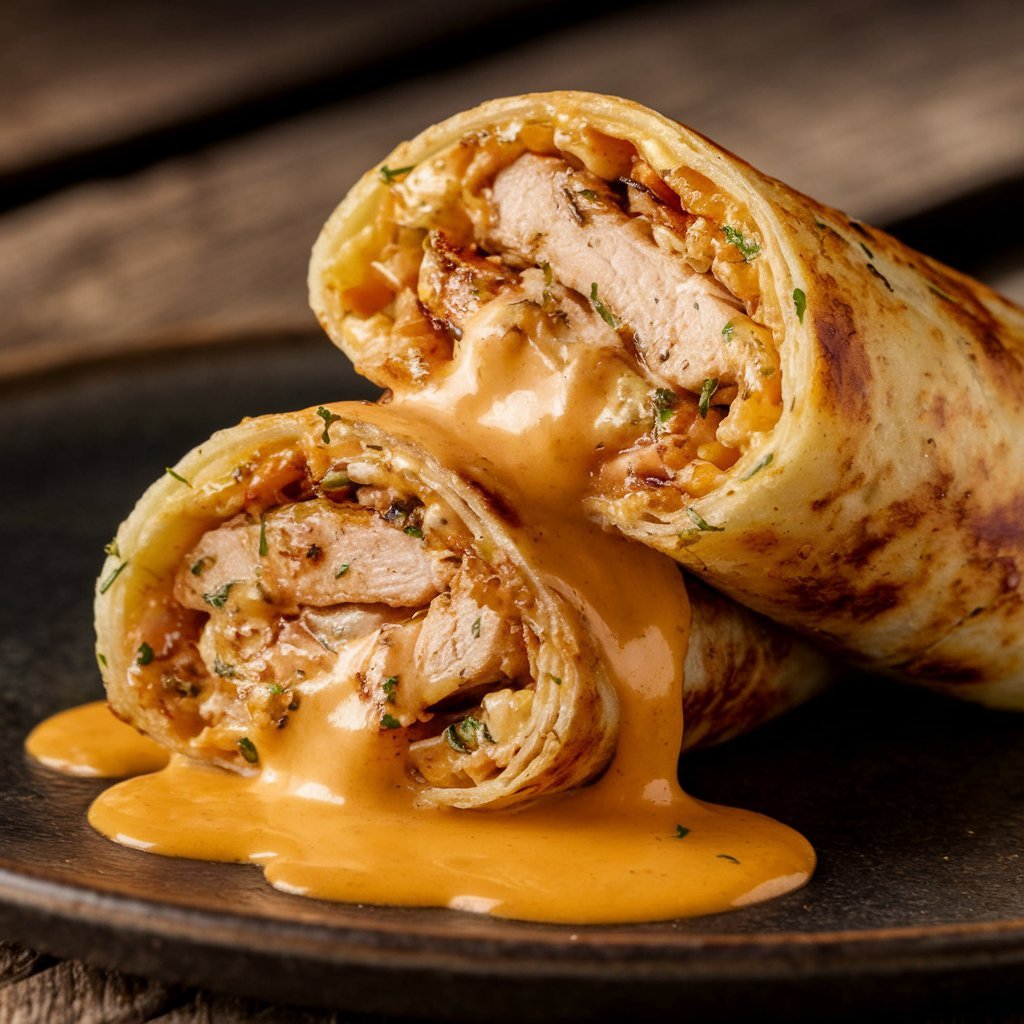
I’ve always believed that the best meals are the ones that feel indulgent without taking up your entire afternoon—and this Cheesy Garlic Chicken Wrap is exactly that.
Juicy, tender chicken is coated in a rich, garlicky, cheesy sauce that hugs every bite. When you wrap it up with crisp greens and soft tortillas, it’s a handheld comfort meal that somehow feels both hearty and fresh.
This wrap is perfect for so many occasions: a quick lunch that keeps you full and satisfied, a simple weeknight dinner when time is tight, or even a meal-prep option to have ready for busy mornings.
Every bite bursts with flavor—creamy, cheesy, garlicky, with just the right hint of freshness from the veggies.
Whether you’re feeding picky eaters, hosting a casual lunch, or just craving something comforting, this wrap checks all the boxes.
📌 Recipe Details
- Prep Time: 10 minutes
- Cook Time: 15 minutes
- Total Time: 25 minutes
- Servings: 2
- Calories: ~520 kcal per serving
Why You’ll Love This Recipe
- Quick & Easy: This recipe takes less than 30 minutes to prepare, making it perfect for busy weeknights.
- Cheesy & Flavorful: The combination of melted cheese and garlic-infused chicken creates an irresistible taste.
- Customizable: You can easily swap ingredients or add veggies to suit your preferences.
- Perfect for Meal Prep: Make extra and enjoy a tasty wrap anytime during the week.
- Great for On-the-Go Meals: Whether you’re packing lunch for work, school, or a picnic, these wraps are convenient and delicious.
- Kid-Friendly: The cheesy goodness and mild garlic flavor make this a meal the whole family will enjoy.
Ingredients You’ll Need
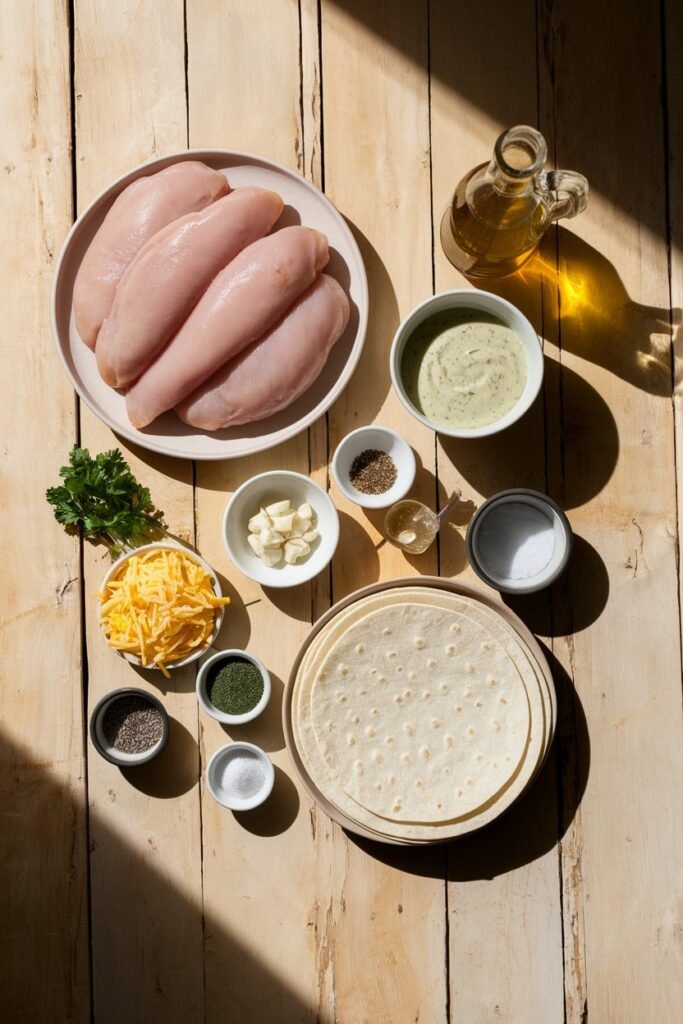
To make these cheesy garlic chicken wraps, you’ll need simple ingredients that come together for an explosion of flavor:
For the Chicken Filling:
- 2 boneless, skinless chicken breasts (cut into thin strips)
- 2 tablespoons olive oil
- 4 cloves garlic (minced)
- 1 teaspoon garlic powder
- 1 teaspoon onion powder
- 1 teaspoon smoked paprika
- 1/2 teaspoon salt
- 1/2 teaspoon black pepper
- 1/2 teaspoon red pepper flakes (optional for heat)
- 1 tablespoon lemon juice (for extra flavor)
For the Garlic Sauce:
- 3 tablespoons unsalted butter
- 3 cloves garlic (minced)
- 1 teaspoon Italian seasoning
- 1/2 teaspoon salt
- 1/4 teaspoon black pepper
- 1/2 cup heavy cream
- 1/2 cup shredded mozzarella cheese
- 1/4 cup grated Parmesan cheese
- 1 teaspoon Dijon mustard (for extra depth of flavor)
Other Ingredients:
- 4 large flour tortillas
- 1 cup shredded cheddar cheese
- 1/2 cup mozzarella cheese
- 1/4 cup fresh parsley (chopped)
- 1/2 cup sour cream (for dipping, optional)
- 1/4 cup green onions (chopped, for garnish)
Step-by-Step Instructions
Step 1: Cook the Chicken
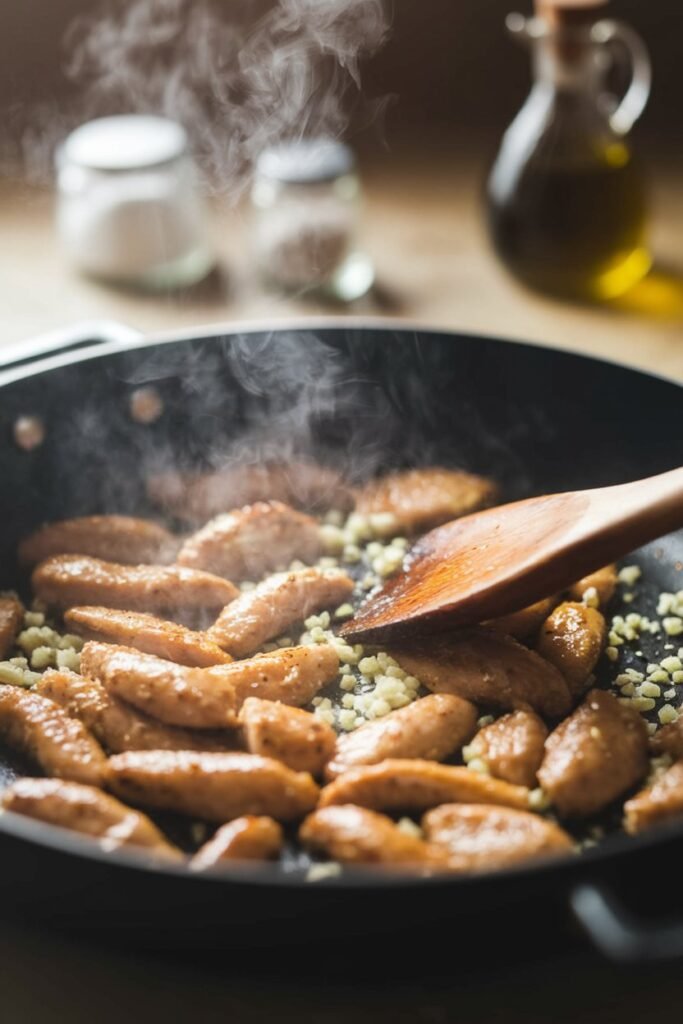
Heat a drizzle of olive oil in a large pan over medium-high heat. This is where the magic begins—the sizzle, the aroma—it instantly makes the kitchen feel cozy.
Add the chicken strips and season them generously with garlic powder, onion powder, smoked paprika, salt, black pepper, and a pinch of red pepper flakes. Cook the chicken, stirring occasionally, until it’s golden brown, juicy, and fully cooked.
Toss in the minced garlic and let it cook just until fragrant, about a minute. Be careful not to let it burn—this little step adds a rich, garlicky depth that makes the chicken irresistible.
Finish by squeezing fresh lemon juice over the chicken and stirring well. The brightness of the lemon lifts all the flavors, creating a perfectly balanced, flavorful bite.
Remove the pan from the heat and set the chicken aside, ready to be wrapped up in your cheesy garlic chicken wrap.
Step 2: Make the Garlic Cheese Sauce
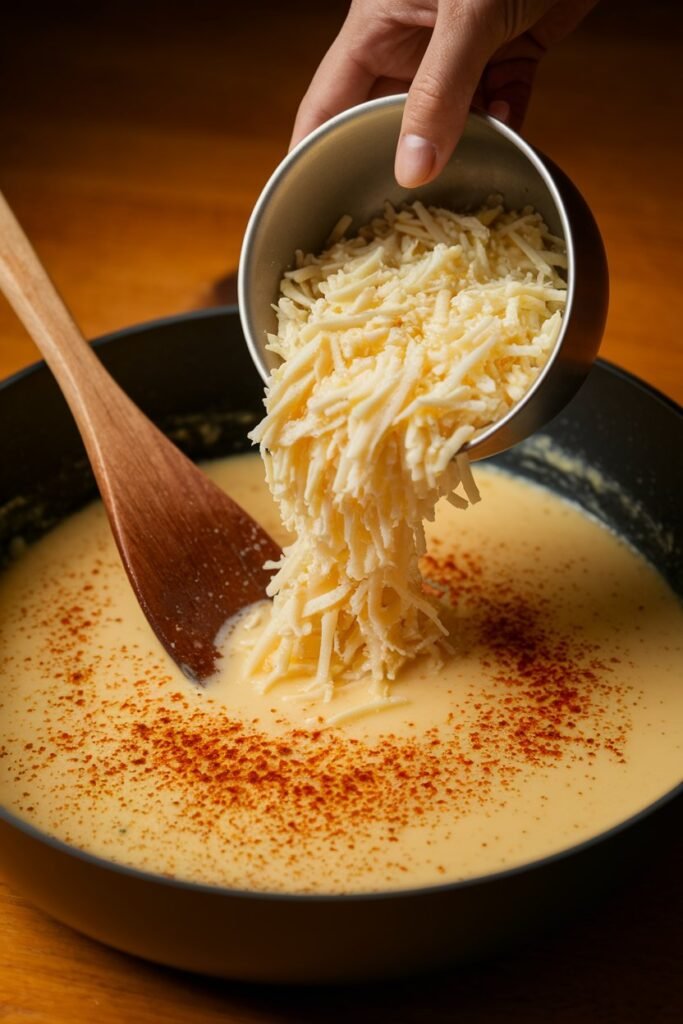
In the same pan, melt a little butter over medium heat. The moment it starts to shimmer, add the minced garlic and let it cook just until fragrant—about 30 seconds. That garlicky aroma instantly makes your kitchen feel inviting.
Stir in Italian seasoning, a pinch of salt, black pepper, and a touch of Dijon mustard. These simple ingredients create a flavorful base that really elevates the sauce.
Pour in the heavy cream and bring it gently to a simmer, letting it warm and thicken slightly. Then, add the shredded mozzarella and Parmesan cheese, stirring continuously until the mixture is perfectly melted, smooth, and creamy.
Once everything comes together into a rich, velvety sauce, remove it from the heat, ready to coat your golden chicken strips in cheesy goodness.
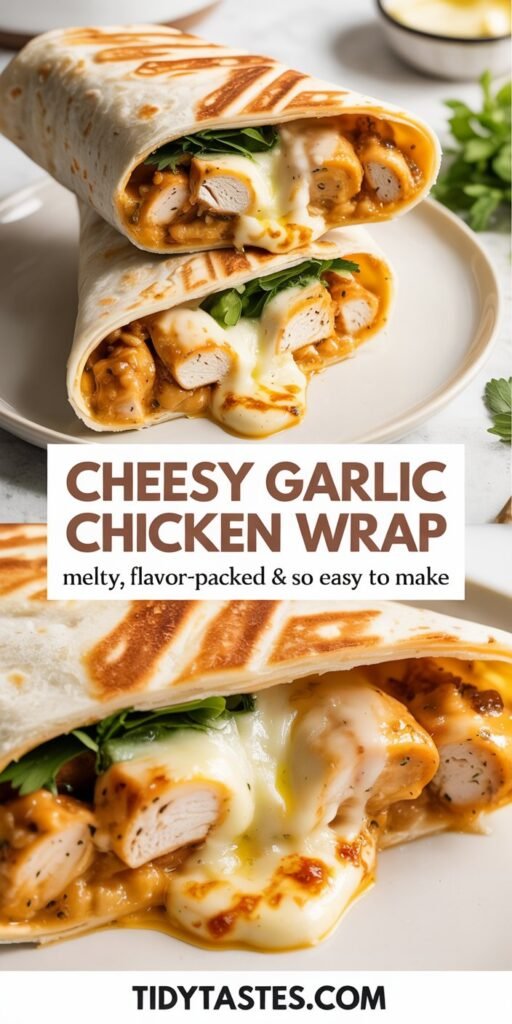
Step 3: Assemble the Wraps
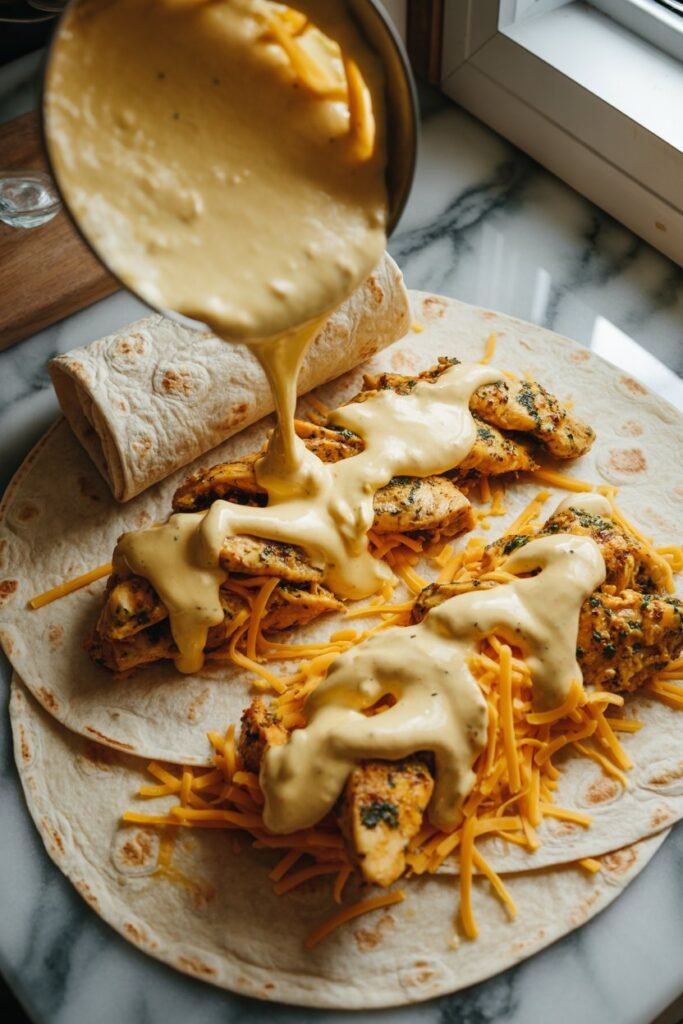
Lay your flour tortillas out on a clean surface, ready for all the cheesy goodness. Spread the cooked garlic-seasoned chicken evenly across each tortilla so every bite has that tender, flavorful chicken.
Spoon a generous amount of the creamy garlic cheese sauce over the chicken, letting it melt into every nook and cranny. Sprinkle shredded cheddar and mozzarella on top for that irresistible gooey layer.
Finally, fold in the sides of the tortilla and roll it up snugly into a wrap. Each one is packed with flavor and ready to enjoy—perfect for lunch, dinner, or even meal prep for the week!
Step 4: Toast the Wraps

- Heat a clean skillet or grill pan over medium heat.
- Place the wraps seam-side down and cook for 2–3 minutes until golden brown.
- Flip and cook the other side until crispy and the cheese inside has melted.
Step 5: Serve and Enjoy
- Remove the wraps from the heat and let them cool slightly.
- Slice in half and garnish with fresh parsley and green onions.
- Serve with sour cream or extra garlic sauce for dipping.
- Enjoy your cheesy garlic chicken wraps while they’re hot and melty!
Tips for Success
I’ve learned a few tricks that make these chicken wraps even better, and I want to share them with you so your wraps always turn out amazing.
Use Fresh Garlic – I always use freshly minced garlic because it gives so much more flavor than garlic powder. You’ll notice the difference immediately.
Choose the Right Cheese – I like mozzarella for that perfect melty stretch, but sometimes I go for cheddar if I want a sharper, bolder taste. You can mix it up depending on what you’re craving.
Warm the Tortillas – I heat my tortillas slightly before folding. You’ll find it makes them easier to handle and prevents tearing while you assemble the wrap.
Make It Spicy – If you like a kick, I add jalapeños or extra red pepper flakes. You can adjust the spice to your taste and really make the flavors pop.
Add a Crunch – I love tossing in crispy bacon bits or crushed tortilla chips for texture. It’s a little indulgent, but it makes every bite extra satisfying.
How I Like to Switch It Up

I love that this chicken wrap is so versatile. You and I can make it feel new every time with just a few tweaks.
Buffalo Style – I sometimes toss the chicken in buffalo sauce before adding it to the wrap. You’ll get a spicy, tangy kick that’s perfect if you like heat.
BBQ Chicken Wrap – I swap the garlic sauce for my favorite BBQ sauce when I want a smoky, sweet twist. It’s amazing how one simple change transforms the flavor.
Veggie Loaded – I like to sauté bell peppers, mushrooms, or spinach and add them to the wrap. You get extra nutrition and a pop of color with every bite.
Low-Carb Option – I use lettuce wraps instead of tortillas for a keto-friendly version. You’ll still get all the flavor, just with fewer carbs.
Mediterranean Twist – I sometimes swap cheddar for feta and toss in olives and sun-dried tomatoes. You get tangy, briny flavors that make the wrap feel fancy and fresh.
Frequently Asked Questions
Can I Use Rotisserie Chicken?
Yes! Shredded rotisserie chicken is a great shortcut. Just heat it up and season it before adding it to the wrap.
How Do I Store Leftovers?
Store leftover wraps in an airtight container in the fridge for up to 3 days. Reheat in a pan or oven for the best texture.
Can I Freeze These Wraps?
Yes! Wrap them tightly in foil and freeze for up to a month. To reheat, thaw overnight and warm in a skillet.
What’s the Best Dipping Sauce?
These wraps pair well with sour cream, ranch dressing, or extra garlic cheese sauce.
Can I Make This Recipe Gluten-Free?
Absolutely! Use gluten-free tortillas or lettuce wraps for a gluten-free version.
What’s the Best Side Dish for These Wraps?
Pair your wraps with a simple side salad, fries, coleslaw, or roasted veggies for a complete meal.

Cheesy Garlic Chicken Wrap
Course: Lunch / DinnerCuisine: AmericanDifficulty: Beginner2-3 Wrap
servings10
minutes15
minutes550 per wrap
kcalQuick, easy, and indulgently cheesy, this Cheesy Garlic Chicken Wrap features tender garlic-seasoned chicken, a creamy garlic cheese sauce, and melty cheese all wrapped in a soft tortilla — perfect for lunch, dinner, or meal prep!
Ingredients
- For the Chicken:
1 lb chicken breast, cut into strips
1 tbsp olive oil
1 tsp garlic powder
1 tsp onion powder
1 tsp smoked paprika
½ tsp salt
½ tsp black pepper
¼ tsp red pepper flakes
2 cloves garlic, minced
1 tsp lemon juice
- For the Garlic Cheese Sauce:
2 tbsp butter
2 cloves garlic, minced
½ tsp Italian seasoning
½ tsp salt
¼ tsp black pepper
½ tsp Dijon mustard
½ cup heavy cream
½ cup shredded mozzarella
¼ cup grated Parmesan
- For the Wraps:
2–3 large flour tortillas
½ cup shredded cheddar cheese
½ cup shredded mozzarella
Directions
- Cook the Chicken
Heat olive oil in a large pan over medium-high heat. Add chicken strips and season with garlic powder, onion powder, smoked paprika, salt, black pepper, and red pepper flakes. Cook until golden brown and fully cooked, about 6–8 minutes. Add minced garlic and cook an additional minute. Squeeze lemon juice over the chicken, stir, and remove from heat. - Make the Garlic Cheese Sauce
In the same pan, melt butter over medium heat. Add minced garlic and cook until fragrant, about 30 seconds. Stir in Italian seasoning, salt, black pepper, and Dijon mustard. Pour in the heavy cream and bring to a simmer. Add shredded mozzarella and Parmesan, stirring continuously until smooth and creamy. Remove from heat. - Assemble the Wraps
Lay out the flour tortillas. Evenly distribute the cooked chicken onto each tortilla. Spoon garlic cheese sauce over the chicken. Sprinkle shredded cheddar and mozzarella on top. Fold in the sides of the tortilla and roll tightly into a wrap. Serve immediately.
Health Benefits
- High in Protein
Chicken provides a lean source of protein to keep you full and satisfied.
Rich in Calcium
Cheese and Parmesan contribute to strong bones and teeth.
Boosts Flavor Without Added Sugars
Using garlic, spices, and cheese adds depth and richness naturally.
Satisfying & Energizing
The combination of protein, healthy fats, and carbs makes this wrap perfect for a balanced meal.
Pro Tips & Variations
Extra Veggies: Add spinach, bell peppers, or avocado for more nutrients.
Lighter Version: Swap heavy cream for half-and-half or Greek yogurt.
Spicy Kick: Add red pepper flakes or sriracha to the cheese sauce.
Meal Prep: Wrap tightly in foil and refrigerate for up to 3 days.
Final Thoughts
These cheesy garlic chicken wraps are the ultimate combination of crispy, cheesy, and garlicky goodness.
Perfect for a quick meal, snack, or meal prep, this recipe is sure to become a favorite in your household. Try it today and enjoy every cheesy bite!
Don’t forget to share this recipe with friends and family, and let us know how it turned out in the comments below! Plus, check out our other delicious wrap recipes for more meal inspiration.